

Shell scripting in macOS is an excellent way to tackle multiple tasks, streamline workflows, and manage devices effectively. Whether it’s your first time or you're a seasoned IT professional, creating shell scripts for Mac can save time and effort by consolidating repetitive tasks.
What is a shell script?
A shell script is a text file (.txt) containing one or more UNIX commands that execute sequentially in a shell environment. Instead of entering commands manually into the Terminal application, you can automate tasks by writing them into a script.
Common shell types: macOS supports multiple shells, including Z shell (zsh), Bash (bash), and others like /bin/sh, for flexibility and compatibility:
/bin/zsh: The default shell in macOS since Catalina (10.15).
/bin/bash: The previous default shell in macOS, still widely used for scripting.
/bin/sh: A lightweight, POSIX-compliant shell for portability and legacy scripts.
Benefits of using shell scripts
Shell scripts simplify complex tasks, reduce manual errors, and save time.
Examples include:
Automating backups.
Managing system configurations.
Performing batch file processing.
Setting up development environments.
While shell scripts may seem intimidating, taking the time to learn them will help make your mobile device management pretty damn quick.

Streamline your Apple device management
Try SimpleMDM free for 30 days to see how the ultimate Apple MDM helps you manage your fleet with ease.
Key components of a shell script
A script can have many components, but you’re likely to run into the following:
Shebang (#!): The first line of every script specifies the interpreter (the shell) to execute the script. For example:
#!/bin/zshThis line ensures the script runs in the specified shell (e.g., zsh or bash).Commands: The actual instructions, such as file operations, text processing, system calls, or running other programs. e.g.:
cdVariables: Used to store and reuse data, e.g., name="John" or count=10
Control structures: Logic for decision-making and repetition, including conditionals and loops.
conditionals (if, case)
loops (for, while, until)
Comments: Lines starting with # are used to document and explain the script’s functionality but do not affect script actions.
Functions: Reusable blocks of code defined and called within the script.
Input/Output redirection: Directs input and output, e.g.:
> for writing to files
< for reading input
and | for piping
Arguments and options: Parameters passed to the script to customize behavior ($1, $2, etc.).
Error handling: Includes constructs, like set -e or checking exit statuses ($?), to manage script reliability.
External commands and utilities: Calls to system utilities or programs for specific tasks, such as:
lsgrepawk
Importance of the shebang
The first line of the script is always the shebang. The shebang consists of two symbols: #!
The # indicates the start of a comment in most shell scripts.
The ! immediately following the # signals that this line is unique — it specifies the path to the interpreter executing the script.
For example:#!/bin/zsh
This line tells the system to use the Z shell (zsh) as the script's interpreter. Without the shebang, the script might run in the user’s default shell, which can lead to compatibility issues if the script is designed for a different shell.
Include the shebang (#!) at the beginning of the script to specify which interpreter you’d like to use for your script.
For macOS:
Use #!/bin/zsh for Z shell (default shell).
Use #!/bin/bash for bash.
Dynamic shebang for portability
To enhance portability, you can dynamically locate the interpreter’s path using:
#!/usr/bin/env zsh
Using /usr/bin/env makes the shebang more portable, as it doesn’t rely on a fixed path for the interpreter (like /bin/zsh or /usr/bin/zsh).
Instead, it works in environments where the location of zsh might differ or where users have custom paths set up for their shells.
The env command dynamically locates the interpreter (in this case, zsh) by searching the system’s $PATH environment variable.
This ensures that the script uses the first instance of zsh found in the user’s environment, regardless of its exact installation path.
Common shell commands
Here are some frequently used commands that you’ll use to customize your scripts depending on the desired actions.
Command | Description |
cat | Read and display the content of one or more files. |
cd | Change the directory you’re working in. |
chmod | Modify file or folder permissions. |
chown | Modify file or folder ownership. |
cp | Copy files. |
curl | Send or receive data from a web server — think sending API requests to your MDM. |
defaults | Read software preference files. |
echo | Return the result of a command to standard output. |
grep | Search a file for a given pattern. |
killall | Stop a running process or app. |
ls | List the contents of a directory. |
man | View the manual page for a command. |
mkdir | Create a new directory or folder. |
mv | Move one or more files or directories. |
/usr/libexec/PlistBuddy | Modify software preference files. |
pwd | See the directory you’re currently working in. |
rm | Delete files. |
rmdir | Delete a directory. |
Note: Rm and rmdir are both delete actions; please use caution.
Write your first shell script
Something I didn’t quite understand when attempting to run my first script in the Terminal is that you can’t just type the script into the Terminal and expect it to execute immediately; you need to save some sort of text editor file first.
I’ll go over how to use two macOS onboard options:
TextEdit: A simple text editor for macOS that supports both plain text and rich text formatting, often used for quick notes or script creation.
nano: A simple, user-friendly command-line text editor for UNIX/Linux systems, designed for basic editing tasks directly in the Terminal.
Other recommended editors include Visual Studio Code and Sublime Text.
Feel free to follow along with the provided simple example for the script:
1
2
#!/bin/zsh
echo "Hello, World!”
Using TextEdit
Open the TextEdit application.
Switch to plain text mode.
By default, TextEdit uses rich text. Switch to plain text by selecting Format > Make Plain Text or pressing Shift + Cmd + T
Enter your script. Copy and paste the following example into the document:
1
2
#!/bin/zsh echo "Hello, World!”Save the file.
Select File > Save (Cmd + S).
Name the file hello_world.zsh
Ensure the format is set to UTF-8 and avoid appending the .txt extension to the filename.
Using nano
Open the Terminal.
Navigate to the desired directory (optional).
Use cd to navigate to the directory where you want to save the script:
cd ~/Documents
Create or edit the script.
Type the following command to create or edit a file named hello_world.zsh:
nano hello_world.zshAfter typingnanofollowed by your script, the following window should open in the Terminal. This is nano.
Enter your script.
In nano, type:
1
2
#!/bin/zsh echo "Hello, World!”
Save and exit.
Save your changes by pressing Ctrl + O (the letter O, not the number zero), then press Enter to confirm the filename.
Exit nano with Ctrl + X.
If you have unsaved changes, nano will prompt you to save before exiting.

Instead of nano, you can also use VIN within the Terminal interface if you’d like more robust options.
Additional nano tips
Navigation: Use the arrow keys to move around the file.
Cut, Copy, and Paste: Use Ctrl + K to cut text, Ctrl + U to paste text, and Ctrl + ^ to mark text for cutting.
Help: Press Ctrl + G to access a list of commands in nano.
Choosing an extension
Use .zsh: For scripts utilizing Z shell-specific features or primarily for zsh environments.
Use .sh: For scripts adhering to POSIX standards, designed to run across multiple shell types.
The file extension is a helpful identifier, but the shebang (#!) defines which interpreter runs the script.
Make your script executable
By default, newly created scripts are not executable for security reasons. This ensures that malicious or unintended scripts are not accidentally run. To make your script executable, use the chmod command:

What is chmod?
The chmod command (short for change mode) adjusts file permissions, which control who can:
read
write
or execute (a file)
One crucial step for every script is using chmod to make the script executable after it has been written.
By default, a newly created script is treated as a regular text file and cannot be run as a program. The chmod command allows you to modify the file’s permissions, explicitly enabling the execute permission for the script.
For example, to make a script executable, you can use:
chmod +x script_name.sh This command modifies the file’s permissions, allowing the script to be executed directly from the Terminal. Without chmod, you would need to invoke the interpreter to run the script explicitly.
Additional examples of chmod usage include:
chmod u+x myscript.sh
Grants execute permission to the file’s owner.
chmod g+x myscript.sh
Grants execute permission to the file’s group.
By marking a script as executable, chmod ensures your scripts are user-friendly and behave like stand-alone programs. It’s a small but essential step in preparing your scripts for use.
Add documentation
Comments are essential in shell scripting. They improve readability and make scripts easier to maintain. Create comments by placing a hash sign (#), aka octothorpe, at the beginning of the line. The shell ignores everything following the # on that line during execution.
How to add comments to your script
Adding comments is pretty straightforward.
Use # to include single-line comments that explain your script’s purpose or individual commands.
For example:
#!/bin/zsh
# This is a simple script to print a message
echo "Hello, World!" # This line prints "Hello, World!" to the terminal
#!/bin/zsh
# This is a simple script to print a message
echo "Hello, World!" # This line prints "Hello, World!" to the Terminal
Types of comments
Single-line comments
Use a full line for comments to explain sections or overall functionality:# This script prints a greeting messageInline comments
Add comments on the same line as a command to clarify its purpose:echo "Hello, World!" # This prints "Hello, World!"
Tips for writing comments
Explain purpose: Use comments to explain what a section of the script does, especially if it’s not immediately clear.
Annotate complex logic: A comment can clarify your intent for any complex logic or nonobvious code.
Avoid over-commenting: While it’s important to comment on your code, avoid adding comments that do not provide additional value beyond what the code already clearly states.
Test your script
Testing ensures your scripts run smoothly before deployment, so always test before deploying your scripts to a production environment.
Run scripts in a safe environment: Test potentially destructive commands (e.g., rm) in a controlled environment, such as a test directory.
Use logging to track execution: Log important actions for debugging:
1
2
#!/bin/zsh echo "Script executed at $(date)" >> /tmp/script.logqTest across multiple shells: Test scripts in different shell environments to ensure compatibility:
bash myscript.sh
zsh myscript.sh
Simple test scripts: Verify functionality with simple commands:
1
2
#!/bin/bash echo "Script ran at $(date)" >> /tmp/test-log.txtExample of a basic test script:
1
2
#!/bin/zsh echo "Ran script at $(date)" >> /tmp/script-test.txtThis appends the current date and time to /tmp/script-test.txt to verify the script runs successfully.
Troubleshoot and debug your script
Handling errors during execution
Use conditional statements to handle errors effectively:
1
2
3
4
5
#!/bin/zsh
if [ ! -d "/path/to/directory" ]; then
  echo "Directory does not exist."
  exit 1
fi
Debugging techniques
Even your most beautiful, well-written scripts can encounter a few issues!
Use these debugging techniques to keep rolling:
Run in debug mode: Add -x to the shebang or command:
#!/bin/zsh -xThis prints each command before executing it.Log outputs: Redirect errors to a log file.
Check permissions: Ensure the script is executable by running:
chmod +x myscript.shIf permissions are correct but the script still fails, try running it with sudo:sudo ./myscript.sh
Sudo allows users to run commands as the superuser (root) for performing administrative tasks with elevated privileges while ensuring security through password authentication and logging.
To rerun the last command with admin permissions, type sudo !!
Syntax errors
Syntax errors often occur due to typos or incompatible commands. Use zsh -n to check for syntax errors without executing the script: zsh -n myscript.sh If there are no syntax errors, the command returns to the prompt without output. Otherwise, it indicates the syntax issue.
Debugging execution
To debug a script and trace its execution, use verbose mode: zsh -x myscript.sh This displays each command before execution, helping you identify where the script fails.
Tools and best practices
launchd
launchd is the system-wide service manager for macOS, responsible for starting, stopping, and managing daemons and agents. It controls tasks and services that run in the background using .plist files.
For example, you can use launchd to automate a daily backup task by scheduling a script that copies essential files to an external drive every night.
Use launchd to automate the execution of shell scripts at specified intervals or events, such as startup, login, or file changes.
Use launchctl to load, unload, and manage services.
Daemons vs. agents
Aspect | Daemons | Agents |
Context | System-wide | User-specific |
Runs Before Login | Yes | No |
Interacts with UI | No | Yes |
Privileges | System-level (root) | User-level |
Shell script examples
Cleaning temporary files
This script deletes files in the /tmp directory older than 7 days:1 2 3#!/bin/zsh find /tmp -type f -mtime +7 -exec rm {} \; echo "Cleaned temporary files older than 7 days."
System health check
This script checks disk usage and available memory, appending the results to a log file:1 2 3 4 5 6#!/bin/zsh echo "System Health Check - $(date)" >> /tmp/system_health.log echo "Disk Usage:" >> /tmp/system_health.log df -h >> /tmp/system_health.log echo "Memory Usage:" >> /tmp/system_health.log vm_stat >> /tmp/system_health.log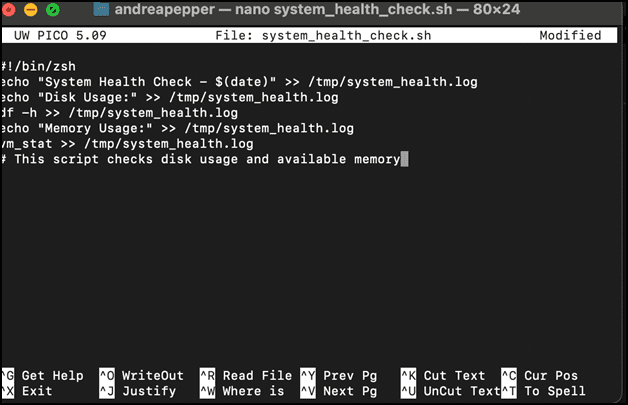
Syncing directories
This script synchronizes files between two directories using rsync:1 2 3#!/bin/zsh rsync -av --delete /path/to/source/ /path/to/destination/ echo "Directories synced successfully.”


Shell scripting resources
Manual pages: You can access detailed documentation for commands directly in the Terminal using the man command. Manual pages provide comprehensive information about commands, options, and usage examples.
How: Type
manfollowed by the command name in the Terminal to open the relevant manual page.
Example: man chmod
macOS shell scripts FAQ
What are POSIX standards?
POSIX (Portable Operating System Interface) standards define a set of operating system interfaces, utilities, and shell scripting conventions to ensure compatibility between different UNIX-like systems. They provide guidelines for system APIs, command-line tools, and environment behavior to promote software portability.
What is verbose mode?
Verbose mode is a setting that provides detailed information about a program or script's behavior. It is often used for debugging or monitoring. Verbose mode typically outputs additional messages to the console to explain each execution step.
What is the difference between VIM and nano?
Both Vim and nano are used within the Terminal, but they cater to different audiences of varying technical expertise.
Vim: A powerful, configurable text editor with multiple modes, ideal for advanced users who need extensive features and customization. Great for programmers and sysadmins.
nano: A straightforward, easy-to-use text editor designed for simplicity and quick edits, making it ideal for beginners or those who prefer a simple interface.

