The swiftDialog tool is in the zeitgeist these days. The wonderful MacDevOps YVR 2024 conference featured several fantastic talks on the subject, and we’ve used it ourselves to tackle internal projects. So we wanted to help you get started with this very neat tool.
In this article, we will show you how to use the popular open-source tool swiftDialog to display custom notification messages to macOS device end users with the help of SimpleMDM.
What is swiftDialog?
swiftDialog is an open-source tool written by Bart Reardon (and maintained with the help of many contributors) that generates customizable, user-facing dialogs. This flexible tool can help you accomplish a nearly infinite variety of tasks, including:
Creating simple notification messages for users
Setting up conditional notifications related to system changes or events
Capturing user input to gather information or update records in other systems ingesting the data
Customizing the device onboarding process during Setup Assistant (for example, see Setup Your Mac from Dan Snelson)
For a more general introduction to swiftDialog, we recommend these great resources:
An excellent swiftDialog workshop from the creator himself at MDOYVR
Prerequisites
What you’ll need to follow this guide:
A SimpleMDM account. If you don’t have one, you can start a free trial for SimpleMDM.
The swiftDialog installer pkg. This can be obtained from the swiftDialog official releases page.
1. Upload the swiftDialog package to SimpleMDM
Sign in to your SimpleMDM account and navigate to the Catalog page. To add the installer to your Catalog, click Add App and select Custom App. Drag and drop or browse to upload the installer. Once the package has finished processing, you can assign it to devices.
2. Assign and deploy the swiftDialog installer
Navigate to the Assignments page. If you are using SimpleMDM’s hosted Munki integration and want to install the tool automatically without user interaction, add the package to an Assignment Group with the type set to Munki and the installer type set to Managed.

The package will be installed the next time the Managed Software Center (MSC) runs on the target Macs. Clicking Actions and selecting Update Catalog triggers active Macs to run MSC immediately.
Alternately, you can allow users to install this package themselves by setting the assignment group type to Munki Self-Serve.
Note: If you are not using SimpleMDM’s Munki integration, the package can also be installed via the MDM protocol using a standard assignment group. However, this requires you to sign the package yourself with an Apple Developer ID. Or, if you are using self-hosted Munki or another package deployment tool, you can install the package using those methods. For this tutorial, swiftDialog just needs to be installed on the target Mac by any means.
3. Configure notification settings
Based on macOS design, we’ll need to preapprove notifications for the Dialog application so that users can actually see them without any additional interaction to permit the prompts.
In SimpleMDM, go to Configs > Profiles, click Create Profile, and select Notification Settings. Then, click Add App, search for Dialog, and select the package name (the name should match the entry in your Catalog).
Configure the settings however you prefer — the default settings are perfectly fine for the purposes of this tutorial. Save the profile settings when you are done.
Note: If you are already using a Notification Settings profile, you can add the Dialog app to your existing profile.
Finally, assign the Notification Settings profile to your target devices. Profiles can be assigned to individual devices for testing or via groups for deployment en masse. See our Knowledge Base article for additional guidance on this process.
4. Use scripts to trigger simple dialogs
For a dialog to appear, it must be called on the device. There are many ways that you could call this, such as manually via Terminal, by another application or package, etc. In this case, we will use SimpleMDM’s Scripts tool to run a job that calls the Dialog tool to prompt the user.
Go to the Scripts page in SimpleMDM and create a new script. For more information on using the Scripts tool, see the official SimpleMDM Knowledge Base documentation.
We will start with a basic "Hello world" script. You can copy and paste the following into the script text editor:
#!/bin/bash
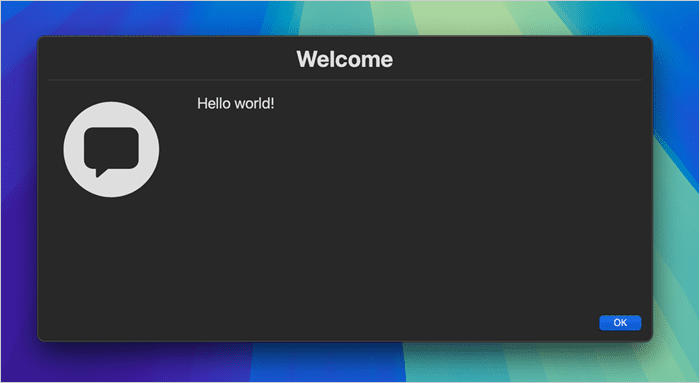
/usr/local/bin/dialog --title "Welcome" --message "Hello world!"
Give the script a name, make sure to include hashbang (#!/bin/bash) at the top, and then save.
Next, go to the Jobs screen and create a new job. Select Run ASAP to run the script immediately, then save the job. Give it a few moments and you should see a notification that looks like this:

Tada!
From here, you can modify this script to customize the prompt to your heart’s desire. We recommend checking out the official swiftDialog documentation for a full list of arguments and customizations.
With SimpleMDM’s Scripts feature, you can also schedule your scripts to run at a later time and date or run on a regular interval for recurring notifications or prompts.
With SimpleMDM, you can manage your Apple fleet with ease. Start your 30-day free trial with SimpleMDM today!

