

If you’re a sysadmin, then you’ve most likely had the “pleasure” of administering updates for your organization. When patching goes right, it’s a beautiful thing. But nothing gets the adrenaline flowing like a half-baked patch wreaking havoc on your managed devices.
If you’ve been on the receiving end of too many patch deployments gone wrong, this article can help. We’ll explore the macOS patching process and how SimpleMDM can significantly improve the experience.
How to patch macOS devices running macOS 12 (Monterey) and earlier
Let’s not waste any time and dive right into the process of installing updates on macOS devices.
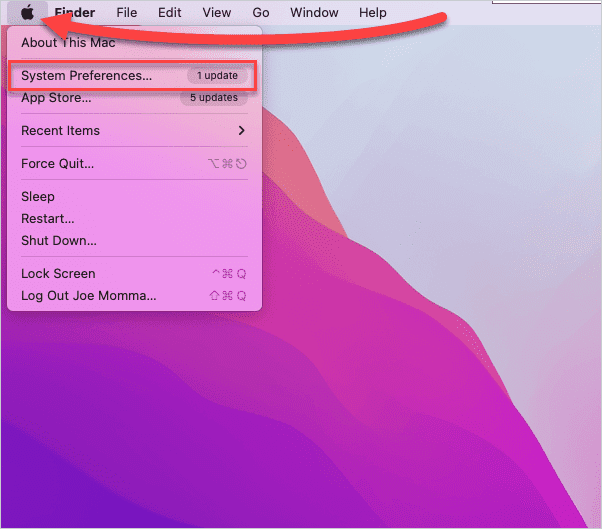
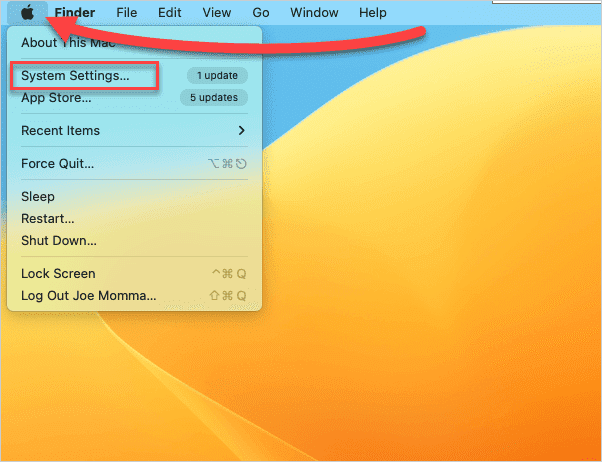
Click the Apple Menu, then click System Preferences.
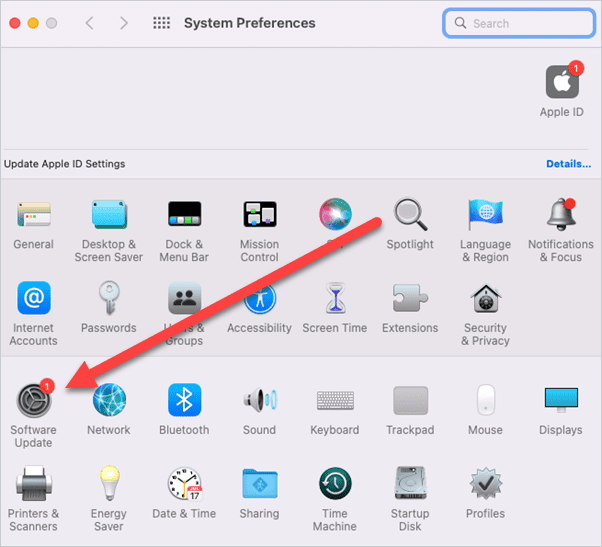
Click Software Update.
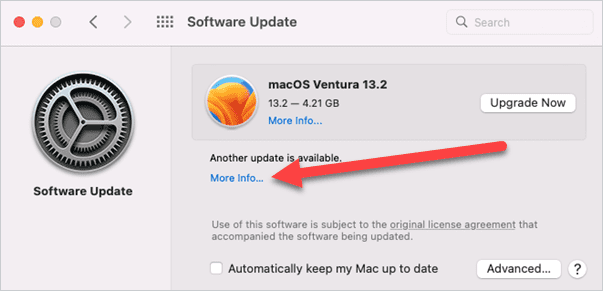
Your Mac will return any available updates. If an OS upgrade is available, you can click Upgrade Now and follow the prompts to update to the new version of macOS. If you just want to check for and install the latest security updates, click More Info.
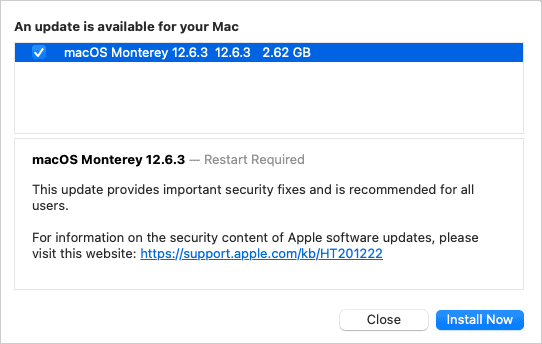
Review the update information, select the update, then click Install Now.


The time it takes to install updates can vary greatly depending on the updates’ size and the hardware’s performance. Some updates may also require several system restarts. OS upgrades, in particular, can take a significant amount of time to complete and may require the password of the volume owner.
You can configure your Mac to install updates automatically at the Software Update menu by selecting Automatically keep my Mac up to date. You can control precisely what updates are installed automatically by clicking on the Advanced button.


How to patch macOS devices running macOS 13 (Ventura)
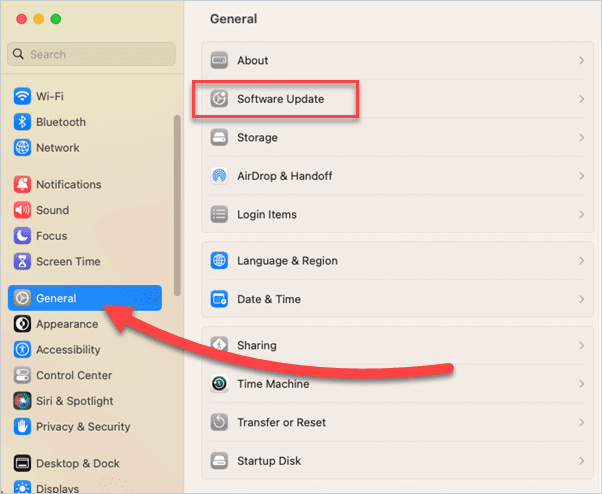
The System Preferences menu has changed in macOS Ventura and is now called System Settings. The new System Settings menu closely resembles the Settings menu on iOS devices. While the update hasn’t made drastic changes to the overall process, it’s worth pointing out how to get to the Software Update screen in macOS 13.
Click the Apple Menu, then click System Settings.
Click General, then click Software Update.
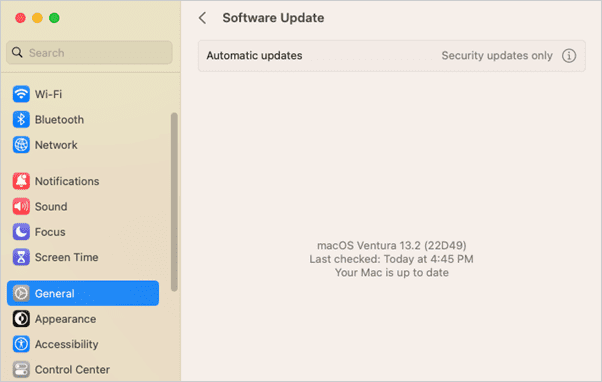
At the Software Update menu, you’ll find available updates and an option to configure automatic updates.


When should you incorporate an MDM solution?
If you’re a sysadmin only managing a few Macs you have physical access to, then manually applying patches is probably all you need. However, as your Mac inventory grows and becomes remotely distributed, the complexity of managing the update process will require a mobile device management (MDM) solution.
SimpleMDM offers system administrators an incredible amount of control over the Apple device ecosystem, including the ability to customize the macOS patch management process. With SimpleMDM, you can perform the following tasks:
Initiate patch installations on individual devices
Initiate patch installations on multiple devices
Delay macOS major updates for up to 90 days
Delay macOS minor updates for up to 90 days
Configure automatic updates
Set deferral limits
Allow pre-release software installations
Get a centralized view of your patching needs
How to manage macOS updates with SimpleMDM
With SimpleMDM, sysadmins can configure and assign profiles to customize the update behavior of their managed macOS devices. The Restrictions profile enables sysadmins to delay macOS major and minor updates for up to 90 days. The Software Update Policy for macOS allows sysadmins to configure update settings.
How to delay macOS updates using the Restrictions policy in SimpleMDM
Here’s how to configure the Restrictions profile in SimpleMDM.
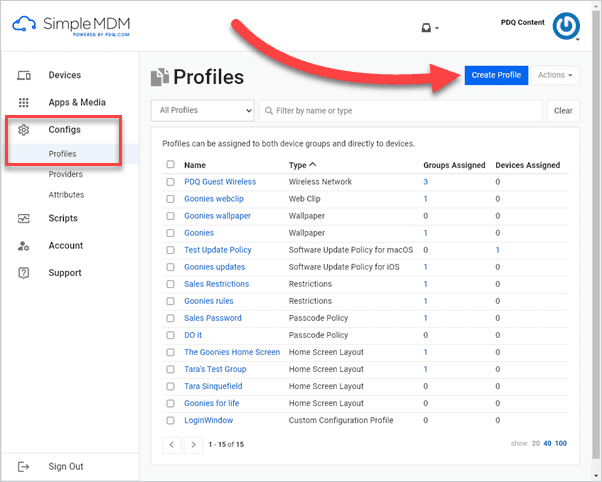
In SimpleMDM, expand the Configs section by clicking the link, then click the Profiles link, then click Create Profile.
Click the Restrictions profile.
Name the profile, and give it a description.
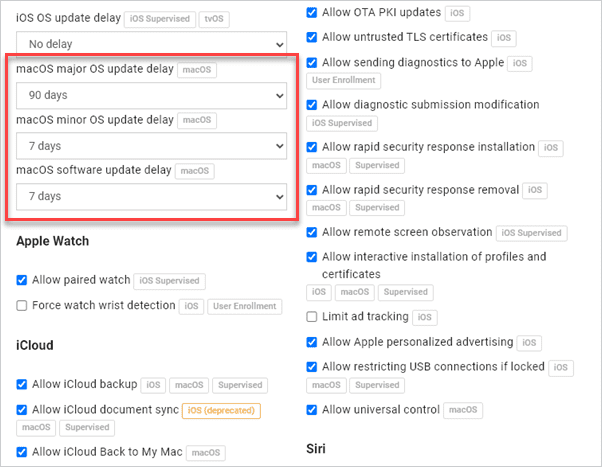
Scroll down, and locate the update delay settings. There are three macOS update delay settings:
macOS major OS update delay: Delays major OS updates for up to 90 days. For example, upgrading from 12.x to 13.x.
macOS minor OS update delay: Delays minor OS updates for up to 90 days. For example, upgrading from 12.5 to 12.6.
macOS software update delay: Delays application updates for up to 90 days.
Configure these settings to match the needs of your organization. If this profile is designated for production devices, consider delaying major OS updates for 90 days, minor OS updates for 7 days, and software updates for 7 days. If this profile is for a pilot group of devices, consider significantly shortening those delays so you can test the new updates thoroughly before distributing them to your production devices.
When finished, scroll to the bottom of the profile page, configure the profile scope, then click Save.


It’s essential to review the remainder of the settings in the Restrictions profile and ensure they are configured correctly for your devices before applying the profile to your Macs.
How to manage update settings using the Software Update Policy for macOS
Configuring the Software Update Policy for macOS profile is similar to configuring the Restrictions profile.
In SimpleMDM, expand the Configs section by clicking it. Next, click the Profiles link, then click Create Profile.
Click the Software Update Policy for macOS profile.
Enter a name and a description for the profile.
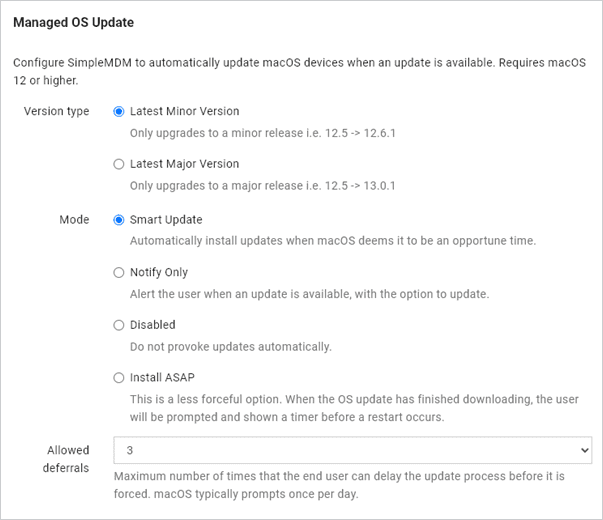
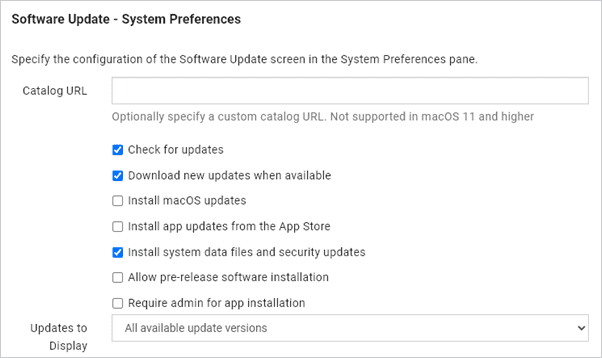
Configure the profile settings to match the needs of your organization. This profile allows you to configure:
Managed OS Update: Controls the versioning and update behavior. It also allows you to configure the maximum allowed update deferrals if you use the Smart Update mode.
Software Update – System Preferences: Allows you to configure the software update settings in macOS, provides additional options to allow pre-release software installations and admin-only app installations, and enables you to specify whether users can see all updates, only the lowest versioned updates, or only the highest versioned updates.
Configure the scope settings, then click Save when finished.


How to assign profiles to devices in SimpleMDM
SimpleMDM allows you to assign profiles at the device level or to groups of devices.
To assign a profile to a single device:
In SimpleMDM, expand the Devices section, then click Devices.
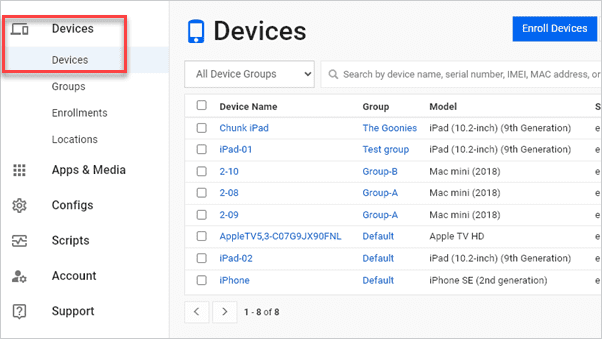
Click on the name of the device you want to assign the profiles.
Click the Profiles tab.
Click Assign Profile.
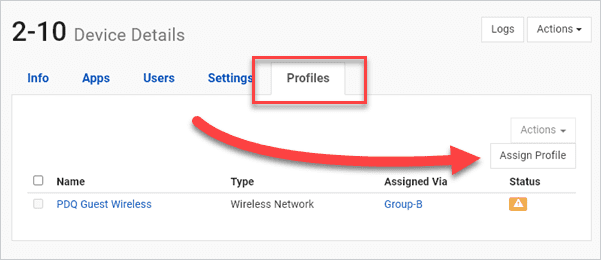
Click Assign next to the profiles you want to assign to the device.
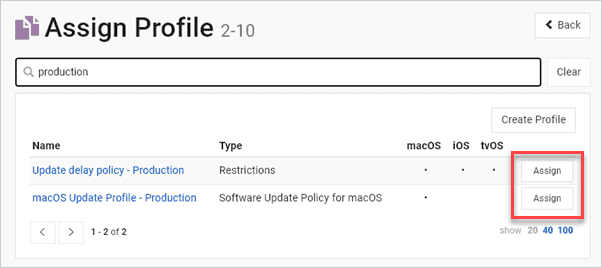


If the device is online, the profiles will be assigned to the device in minutes.
To assign profiles to a group:
Expand the Devices section, then click on Groups.
Click on the group you want to apply the profiles to.
Click the Profiles tab.
Click Assign Profile.
Click Assign next to the profiles you want to assign to the group.
How to view the OS version of your devices in SimpleMDM
SimpleMDM makes it easy to identify the current OS version of your managed devices. You can view this information in the main Devices list or inside the details window of a device.
By default, the Devices list may not display the OS version of your devices. You can add this information to the display by clicking the gear icon in the column’s header, then selecting the OS Version column.


To find the information for a single device, click on the device name. You’ll find the OS Version in the Info tab under the Device Details section.

How to initiate update installations using SimpleMDM
SimpleMDM gives you the option to initiate update installations for devices for which updates are currently available. You can see if an update is available by clicking on a device to view its details. If an update is available, you’ll have the option to install the update. To initiate the installation, click Install Update.

If both minor and major updates are available, you’ll have an option of which update to install. Select the option you want, then select the update mode. If you choose Smart Update, you can set the maximum number of allowed deferrals. When you have finished selecting your options, click Update Devices.

You can also initiate update installations on multiple devices at once. Select the devices you want to initiate the installations on from the Devices list, then click Actions > Update OS Version.

You’ll see update options depending on what updates are available to install, the update mode, and the allowed deferrals. Configure the settings, and click Update Devices.
Some updates may require user interaction.
It’s important to note that some updates may require user interaction. While open and frequent communication is the key to building a good relationship with your users, sometimes a little extra help is needed.
Nudge is a free utility designed to help curate the macOS update process. It notifies users of pending updates and provides them with helpful information about the process and available deferrals. Check out Nudge on its GitHub page.
So many updates, so little time…
Updates are a constant in the IT industry. They’ve been around for years and aren’t going anywhere anytime soon. Perhaps one day, the update process will be so refined that all updates can just be applied in the background without the user ever noticing. Maybe they’ll be so reliable that users can install updates the same day they’re released without fearing an update may cause issues. Until that time comes, simplify your patch management with SimpleMDM. Try SimpleMDM for free, and see how it can drastically simplify your Apple device administration.


