The onboarding process is critical in device enrollment. It’s an experience that both you and the end user want to be as smooth and touch free as possible (much like a ride on public transportation). SimpleMDM already offers customization with a welcome screen that allows you to present a logo and message when a user begins the enrollment process. Building upon this feature, we’re excited to announce new functionality — the ability to create a form and display it on the welcome screen during enrollment.
The form fields are mapped to custom attributes, making it possible to store user input as an attribute once the form is submitted and the enrollment is complete. This functionality enables you to collect essential input from end users during the enrollment process and store it on the device record. In addition, the stored data can be inserted automatically into other areas, such as configuration profiles, that require or benefit from user-specific information, like email, VPN, Login Window, and more.
The goal of welcome screen forms
The main reason for implementing this functionality is to enable you to prompt end users with input fields to capture information and conveniently store it in custom attributes on the device record. This can be achieved using the welcome screen that we have already built into the enrollment flow. For example, the end user would experience the following:
The user reaches enrollment welcome screen.
On this screen, form fields appear requesting the user enter information. For example, we may want to capture their first name, last name, and email address.
The user enters this information, then clicks Start Enrollment.
Optionally, you can configure fields to be required or optional. The user must fill out required fields before Start Enrollment becomes clickable.
Clicking the following button downloads the enrollment profile.
How might I use welcome screen forms?
Example #1: Improving device naming and user inventory collection
The methods to collect user information with MDM software are somewhat limited. You generally need an external source of data. Historically, this may require integration with an identity provider (such as SAML authentication for enrollments). The new welcome screen functionality provides an alternative way to collect relevant information without manual intervention from the admin. For example, if you want to name your devices in SimpleMDM using your end users' first names, last names, and departments, the form field feature can help.
Create custom attributes for first name, last name, and department.
On the welcome screen form, add matching fields for each of these attributes. For department, you may want to use a drop-down menu since each employee only belongs to one department.
As needed, set which fields are required to complete the enrollment.
Enable the welcome screen for your enrollment(s).
Under Enrollment Settings in SimpleMDM, add these attributes using the attribute syntax to the Name Format field:

Save these settings.
Start enrolling your devices.
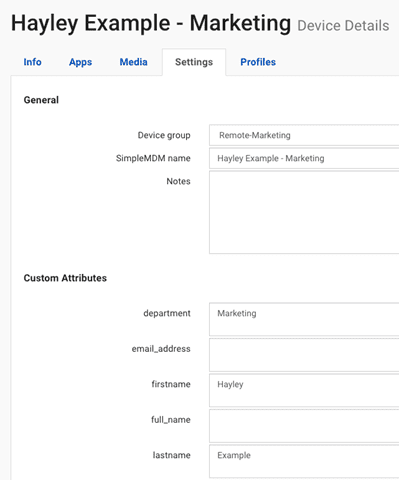
When users enroll their devices and fill out the form, the newly enrolled devices automatically have their SimpleMDM device name set to match the values users entered.
For example, here's what my new device record looks like in SimpleMDM:

Example #2: Streamlining email account configurations
Currently, configuring individual email account configuration profiles (or other accounts) can be time consuming task. Whether it’s manually configuring each profile, using the API, or through a combination of SAML authentication with attribute mappings and custom attributes within the email account profile, the process can be quite tedious.
With the new welcome screen form feature, the user would manually enter their own email address into the form field, which would sync to the custom attribute field used in the email account profile. As a result, the required data automatically populates, and the account is configured on the device. The admin no longer has to configure SAML authentication or set up each account individually.
Creating forms on the welcome screen
The steps to create a form are simple and straightforward:
Create the custom attributes under Configs > Attributes.
On the New Welcome Screen page, click the + button to add a new form field.
Select your form configuration options:
Label Name: Pick a label for the field on the user-facing form.
Custom Attribute: Choose the custom attribute for the value to store in on the device record.
Dropdown (yes/no): Check this box to make the form field a drop-down selection.
Dropdown Options: If Dropdown is enabled, enter a comma-separated list of values to display in the drop-down list.
Required (yes/no): Check this box to make the form field required (e.g., the user cannot submit/continue with enrollment until they have entered something in this field).
Save the changes.
The ability to create custom forms during device enrollment creates endless possibilities for you to capture essential user input and streamline device management workflows. Don’t miss out on the opportunity to test this new functionality for yourself. Start a free 30-day trial or request a demo.
You can also learn more about feature releases in our 2023 recap, or check out some of our personal favorites: scheduled scripts and auto attributes, account-driven enrollment, and Return to Service.


