

Every sysadmin has horror stories about migrating from Windows to Mac.
This process involves transferring files, settings, applications, and data from a Windows PC to a Mac.
Typically, a user requests a transfer from an existing Windows device to the latest Mac, but the migration can encounter issues, such as failed backups, unsynced cloud storage, and corrupted files.
The solution to these problems? Migration Assistant for Windows.
What is Migration Assistant for Windows?
Migration Assistant for Windows is the Windows application that Apple developed to automate data transfer from a PC to a Mac. You can download and install it for free on the source PC, and it’s compatible with Windows 7 and later.
Now, let’s walk through the steps for a successful enterprise Mac migration.
It starts before the migration.
If you're unfamiliar with Apple device management, you may not realize that a lot of work goes into a successfully deployed endpoint before opening the box. It starts with purchasing your Apple device from the right vendor and syncing it to Apple Business Manager.
1. Purchase your Apple device through Apple or an Apple Authorized Reseller
Where you buy that Midnight Black Air is critical.
Buying your device directly from Apple or an authorized reseller is essential so it can automatically sync with your Apple Business Manager (ABM) account. If you still have devices from an unapproved vendor purchased after 2018, you can manually enroll them into ABM, but it will take some extra effort.
2. Establish an Apple Business Manager account
Once you establish an ABM account, your Apple Authorized purchases automatically appear. From this account, you can manage devices and Apple IDs. You can also integrate your preferred MDM.
3. Auto-enroll your device through your MDM connected to ABM
Once your devices are in ABM and pointing to your MDM, you can make an auto-enrollment configuration in your MDM to give you the most control over your managed devices.
4. Disable software that could prevent migration
During migration, it's crucial to disable any third-party software that could block the migration or prevent it from being initiated.
This may include software such as:
VPNs
Firewalls
Antivirus
Single sign-on (SSO) agents
Other login agents
After completing the migration process, re-enable the software you disabled to ensure proper system safety and compliance for the new machine.
Example: A migration encountering this type of blocker may get stuck on the following setup page and never move forward.

5. Set up Migration Assistant
We'll use Migration Assistant to move everything from the initial setup screen.
Connect devices to a network
Use Migration Assistant by connecting the Windows PC and Mac to the same network, either via Wi-Fi or Ethernet.
Wi-Fi: A peer-to-peer connection is easiest. Ensure both devices are on a network with hefty bandwidth.
Ethernet: For a stable connection without the risk of dropping, I recommend using an Ethernet cable (you may need an adapter).
6. Migrate data from PC to Mac
Ensure no applications are running on the source PC by navigating to Task Manager and clicking End task on any applications still running.
Open the Migration Assistant for Windows application that you downloaded onto the source PC.
Loading...
Open the Migration Assistant application on a Mac with an established user account.
Boot up the new machine.
Connect to the same Wi-Fi as the source PC.
Allow the device to connect to remote management / auto-enroll.
Proceed through the setup pages until you see the following screen:
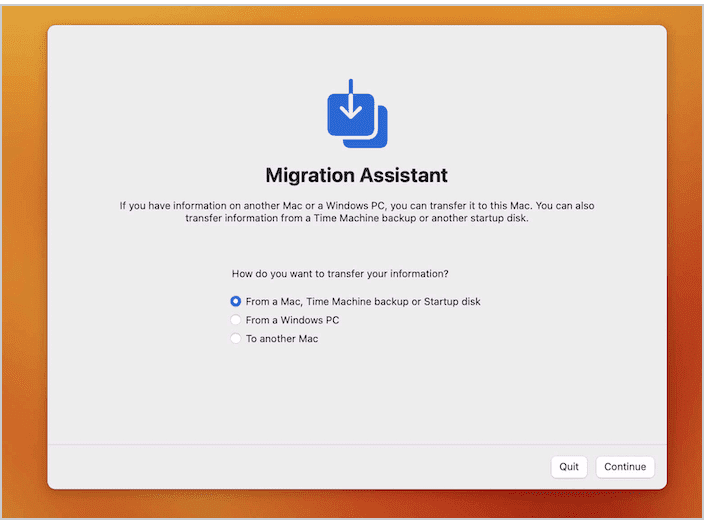
Click the option to transfer From a Windows PC.
Verify that the passcodes on each device match.
Loading...
Select the information you would like to transfer.

Transfer information options
User folder: When transferring from a PC, you can only transfer one user folder at a time. If you have multiple users to transfer, you must repeat these steps for each user.
Other files on C: Select desired files per drive location.
11. Set a new user password.
12. Authorize source user password.
13. Allow devices to sit overnight, plugged into a power source, to complete the transfer.
Transfer time estimate
In my experience, the actual transfer time is often about half the estimated time displayed.
For example, a migration showing 1 hour and 10 minutes took only 34 minutes and 25 seconds.

Note: As of macOS 13.0, Migration Assistant on a Mac enrolled in MDM automatically disables the transfer of System & Network Settings to avoid management conflicts.
Troubleshooting: If you're having issues completing the migration successfully, try unchecking:
Settings
Network Options
or Other Files and Documents (if the option is present)
PC to Mac migration FAQs
What is Migration Assistant?
Migration Assistant is an Apple utility that automates the transfer process, making it easy to transfer data from a Mac, PC, or Time Machine backup.
What are PC to Mac migration best practices?
Depending on your setup, you could opt not to transfer specific files if you want to be abundantly cautious to get a successful migration.
For example, suppose all the required work applications are already programmed through an MDM to autodeploy upon enrollment. In that case, you don't necessarily need to select the option to transfer the existing applications. You could transfer all the folders listed under the user. This approach ensures a clean installation.
How long does a Windows-to-Mac migration take?
A Windows-to-Mac migration can take anywhere from a few hours to overnight. It all depends on the amount of data you're transferring, your transfer method, the bandwidth of your transfer method, and your network environment.
How do I transfer data between Windows and Mac?
Several data migration options are available to streamline the transfer process. The Migration Assistant is a useful built-in tool for both Windows and Mac, while cloud-based options, such as iCloud, OneDrive, and Box, offer seamless synchronization and sharing capabilities. Additionally, utilizing shared network drives or folders can facilitate efficient transfers, and mapping a network drive on a Mac is easy through the Connect to Server feature.
Does Mac Migration Assistant transfer everything?
Due to compatibility constraints, Migration Assistant cannot create an exact duplicate from a Windows environment. However, a Mac-to-Mac migration can be a complete environmental duplication when restoring from a Time Machine backup. Mac Migration Assistant can efficiently transfer data outside of a system restore, including emails, settings, contacts, appointments, tasks, multimedia files, bookmarks, custom preferences, and documents between Windows and Mac. It moves files to their respective Mac apps and requires administrator access on the PC for optimal performance. On macOS Ventura, known Wi-Fi networks also transfer.
For a complete list of all transferable data, please refer to Apple's transfer documentation.
Is Mac easier to use than Windows?
Yes, many users find Mac easier to use due to its intuitive, streamlined interface and consistent user experience across devices. While users often find macOS more user-friendly than Windows, it might be challenging at first due to differences in settings and locations. Remember: Ease of use varies between individuals, so it's best to give both operating systems a shot and choose whichever suits your preferences. Just explore, and go with your gut!
What are the pros of switching from Windows to Mac?
Switching from Windows to Mac provides benefits that include a visually appealing interface, improved security due to UNIX-based architecture, frequent updates, enhanced performance, and hardware and software designed under the same roof for better power management and optimizations.
Discover the ease of Apple Migration Assistant and simplify your device management experience even further with SimpleMDM. Don't miss out on experiencing seamless device management for your organization — start your 30-day free trial of SimpleMDM today and level up your migration and device management processes!


