In this article, we will discuss what an authenticated enrollment is, how to set up enrollment authentication within SimpleMDM, and different ways that it can be used within your device deployment process.
What is an authenticated enrollment?
Authentication for device enrollments allows you to integrate the MDM enrollment process with an identity provider. Once configured, users are forced to authenticate against their identity provider with their credentials in order to successfully enroll their device in MDM. For example, if you are using Okta as your identity provider, you can force users to enter their Okta credentials in order to proceed with the enrollment process. With SimpleMDM, you can configure authentication for enrollments using any identity provider service that supports custom SAML or LDAP integrations, including Google Workspace (formerly G Suite), Microsoft Azure, Okta, OneLogin, JumpCloud, ADFS, and many more.
Why add an authentication process to enrollment?
There are a number of reasons why one might want to set up authentication for enrollments. Two of the most significant reasons are detailed below.
First, enrollment authentication provides a layer of security. Many companies will use MDM to push out custom apps, configure accounts, or provide content to devices that contains sensitive information. By forcing users to authenticate during enrollment, it ensures that only users who properly authenticate with credentials from your identity provider enroll a device in your account and access this information. If a device ends up lost or stolen, or if an enrollment URL ends up in the hands of an individual with malicious intent, sensitive data is not accessible.
Second, it provides administrators the ability to import user metadata from the identity provider into the MDM system. Within the context of SimpleMDM, this means importing user information from your identity provider to custom attribute fields in SimpleMDM is possible. There are numerous ways this functionality is used and we will cover a couple common use-cases later in this article.
How do I set up authentication for my enrollments in SimpleMDM?
While the concepts are generally the same, the exact steps to configure authentication for enrollments may vary a bit from one identity provider to another, and the naming convention used for certain fields within the settings for those providers may vary as well. In this example, we cover the process to set up SAML authentication for enrollments with Google Workspaces. The steps are purposely general in order to accommodate any potential changes to interfaces that may occur between the two systems.
Before setting up authentication, you’ll first need to configure an enrollment within SimpleMDM. Read our knowledge base article on device enrollment for more information about the different types of enrollments and how to configure them.
Once you’ve created your enrollment, you’ll see an “Authentication” tab under that enrollment with a dropdown list. When setting up authentication for the first time, you’ll need to select “New Enrollment Authentication” from the dropdown list. Keep in mind these specific steps, field names, interfaces, etc. may change over time. Our example uses Automated Enrollment (DEP) but authentication can be configured for any type of enrollment. For instructions on setting up Automated Enrollment with Apple Business Manager, consult our knowledge base on Automated Enrollment.
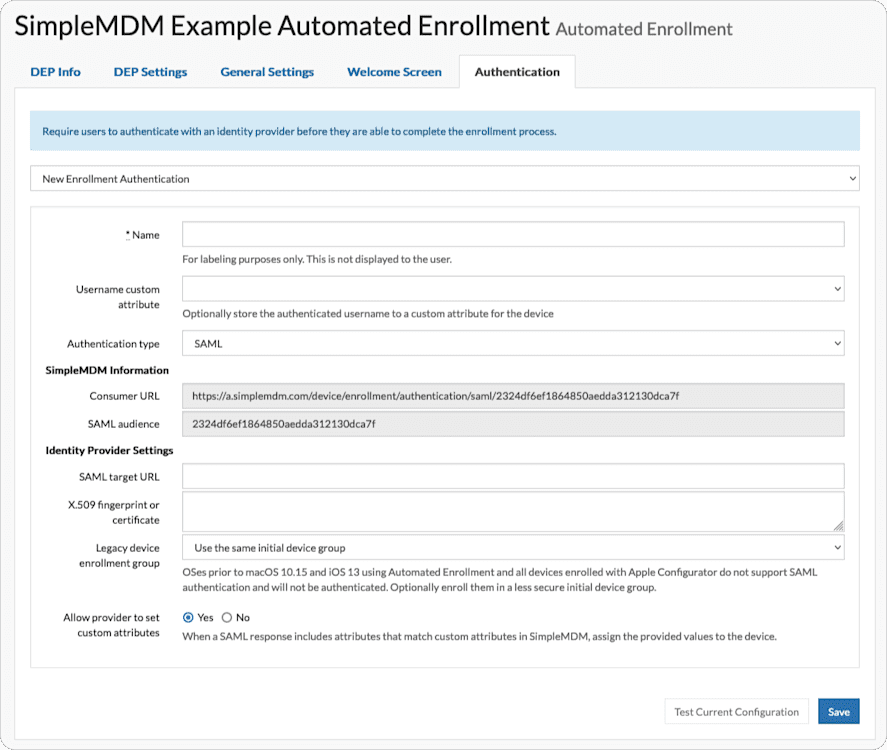
First, give the authentication a name that is meaningful to you. SimpleMDM allows as many authentication setups as you’d like so make sure each is aptly named.
Second, set up the integration within your identity provider. For Google Workspace, login to the admin console, then go to Apps > Web and Mobile Apps. Create a new app (“Add Apps”) and name it.
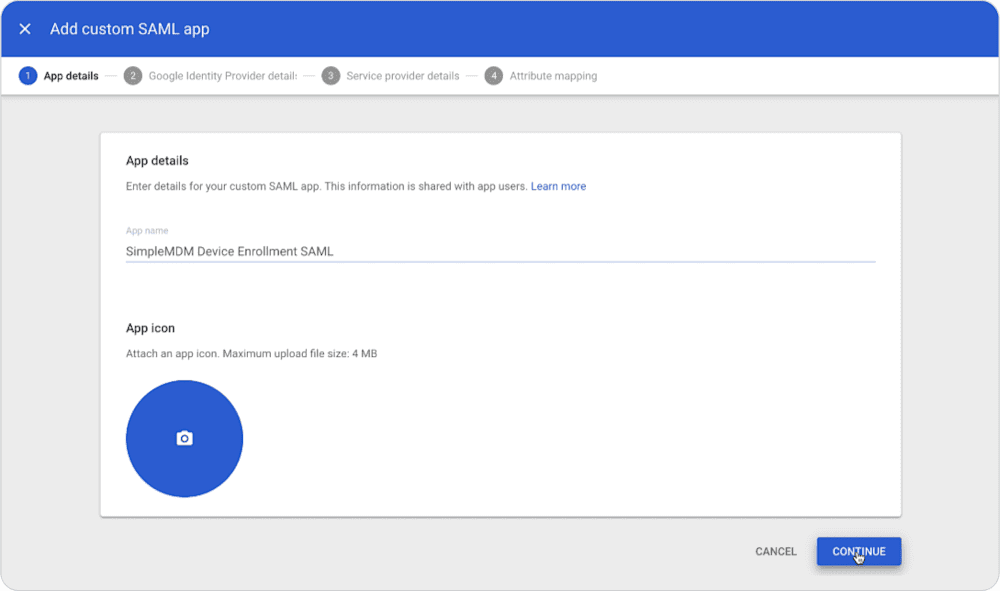
On the next screen in the Google admin console, copy the “SSO URL” from Google and paste it into the “SAML target URL” field in SimpleMDM. Copy the certificate value from Google and paste it into the “X.509 fingerprint or certificate” field in SimpleMDM. In some cases, certain certificate values from identity providers need to be copy-and-pasted into a separate text editor and then copied again and pasted into SimpleMDM to remove formatting.
At this point, copy the following values from SimpleMDM and paste them into your identity provider settings. For Google Workspace, copy the “Consumer URL” from your SimpleMDM settings into the “ACS URL” field in the Google settings. Then copy the “Audience” value in SimpleMDM to the “Entity ID” field in Google.
Next, in Google Workspace, you are shown a screen to configure attribute mappings.
Creating and Using Custom Attributes
Custom attributes act as variables allowing you to set unique values at multiple levels of granularity:
Default level: applied when no other value is specified.
Device Group level: takes precedence over default level.
Device level: takes precedence over both default and Device Group level values.
To create a custom attribute in SimpleMDM, navigate to Configs > Attributes in the MDM interface, click “Add Attribute”, and assign the attribute a name. In this case, the attribute name should be an exact match to how the attribute is referenced in the SAML response from your identity provider’s system. For example, when syncing a user’s email address from your identity provider to SimpleMDM and your identity provider uses “email_address” to name the email address field in their SAML response, you need to create an equivalent custom attribute within SimpleMDM.
For example:
(Identity Provider SAML attribute) “email_address” <> (SimpleMDM custom attribute) “email_address”
“email_address” <> “emailAddress” = will not work, as the attribute naming convention does not match exactly.
In SimpleMDM, create a custom attribute for each attribute value that you would like to capture from your identity provider. Then, in your identity provider, create mappings for these attributes:
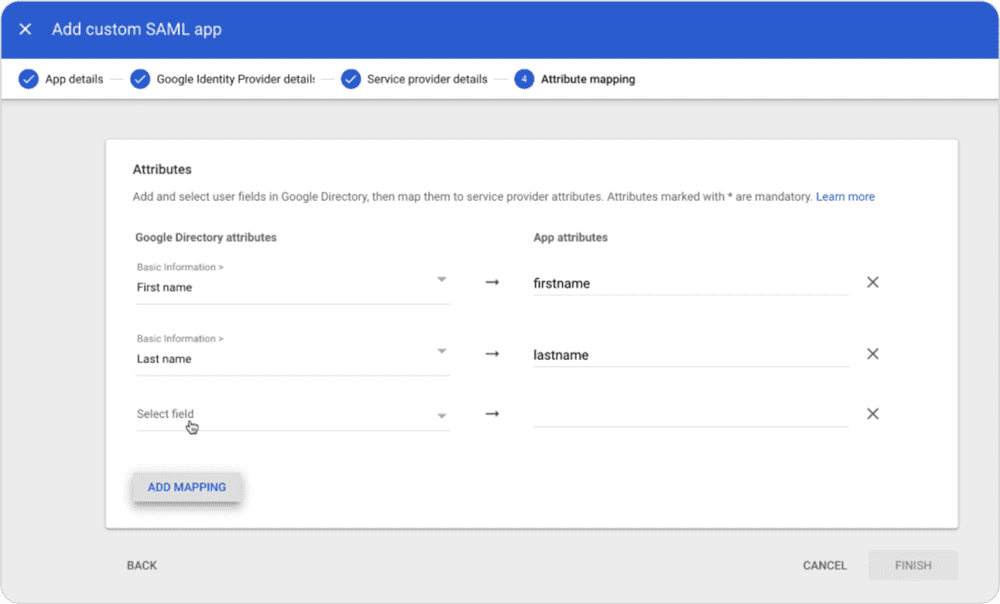
It is worth noting that attribute field names displayed in your identity provider may not be the same format used when the attribute values are sent via SAML. For example, though the screenshot above shows “First name” for a field, we specified the “firstname” as our custom attribute since that is the naming convention used in the SAML response.
Once you set up your attribute mappings on the identity provider side, the next step is to save your configuration and turn it on. After you turn on the integration, go to the Authentication tab in SimpleMDM and click “Test Current Configuration” at the bottom of the authentication settings. When testing your configuration, you should see a prompt to complete the authentication process with your identity provider. In this case, we logged in using our Google Workspace credentials.
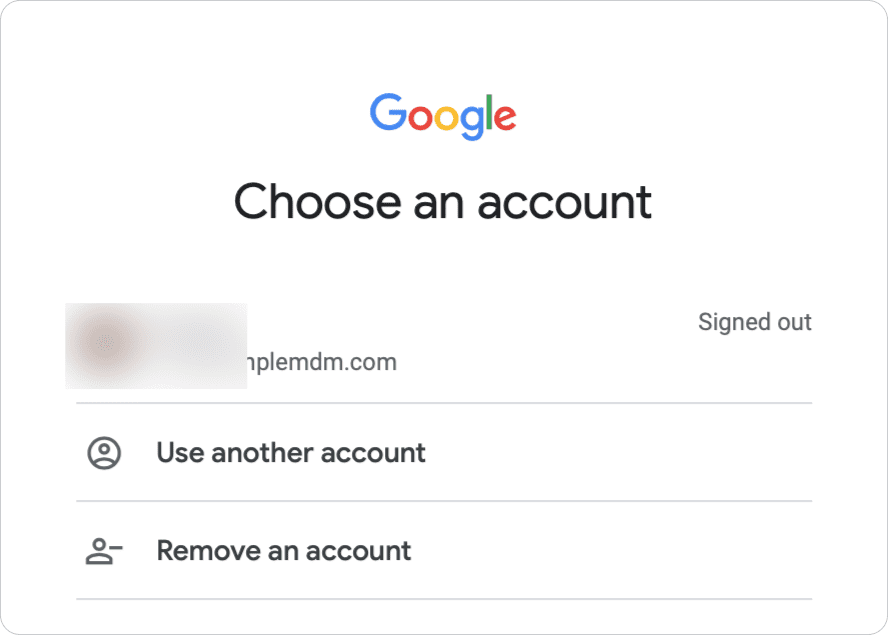
After authenticating successfully, you will see a screen to map attributes from your identity provider to MDM:
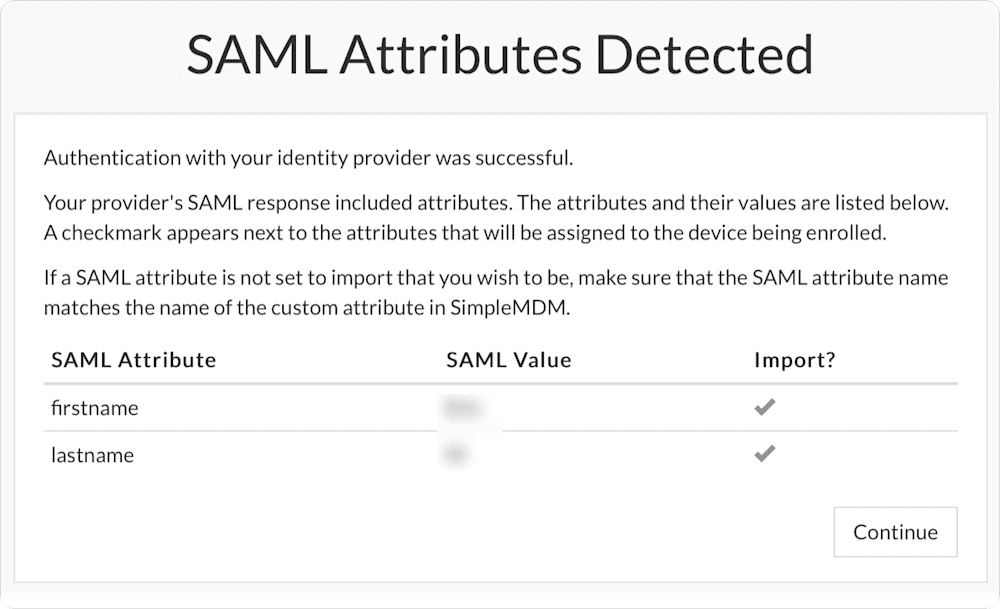
This screen shows the attribute names and examples of the values populated into those attribute fields. Make sure that the attributes and example values match up the way you would expect them to – if they don’t, that may mean that they aren’t configured correctly.
When you are done, click “Continue” – you will be returned to the Authentication settings page. Congrats! You have successfully configured authentication for your enrollment.
Now what? What else can I use authentication for?
Great question. There are many, many different ways that you can utilize authentication with your device management workflow. In the next section, we cover a couple basic examples.
Example #1: Automatically populate username fields on macOS
This is one of the most common uses for SAML authentication that we see. When a Mac goes through the Automated Enrollment process and the user completes the authentication process, you can set up the Automated Enrollment (DEP) settings to automatically populate the short name and full name fields when the user is prompted to create their account during Setup Assistant.
To configure this, first make sure you have selected the “username” option from the “Username custom attribute” field dropdown in the Authentication settings:

Next, go to the “DEP Settings” tab and look under the “macOS Account Setup” section. You’ll see a few different options:
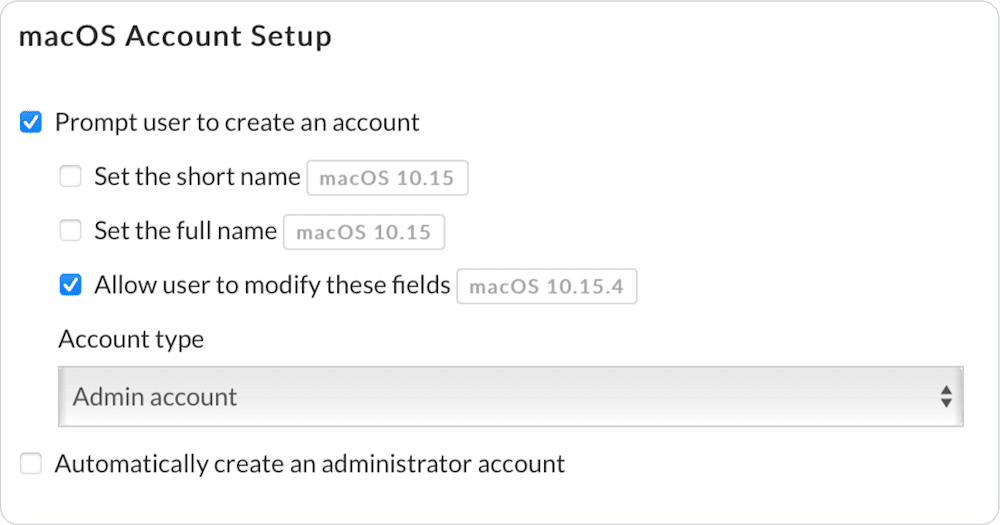
In this case, we check the boxes to set both the full name and the short name. Then, we use the custom attribute syntax to specify the username attribute as the value that is populated when the user creates their account. In this example, we also automatically create an administrator account.
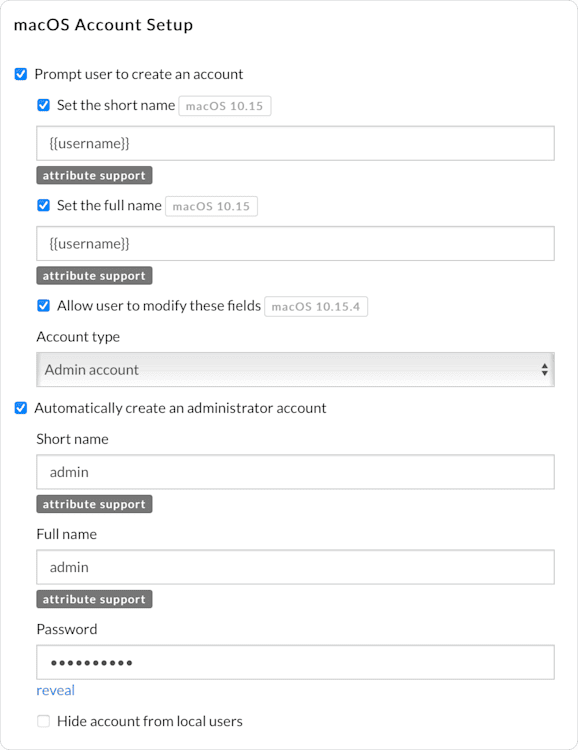
Make sure to save your changes when you are done.
Now, when users complete Setup Assistant and Automated Enrollment process on their Mac, their account usernames are already configured for them:
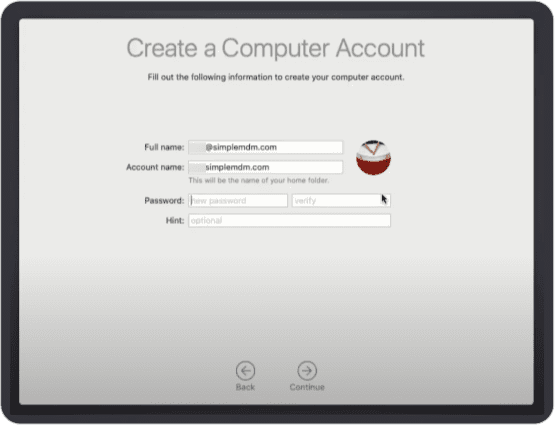
Users only need to set their password.
It is worth noting that you do not need to use the {{username}} attribute – you can use any attribute value that you mapped from your identity provider. You may also use a combination of attributes, such as:
{{firstname}}{{lastname}}
Which, in this case, sets a value of “EricM”.
Example #2: Automatically configure email account profiles
Now that you have authentication in place and populated custom attribute values, put these attribute values to use elsewhere within your account. For example, automatically populate user’s information for an Email Account configuration. Use the attribute syntax within the Email Account profile to assign a single Email Account profile to all of your managed devices instead of having to set up a different profile for each device. Below is an Email Account profile example using attributes:
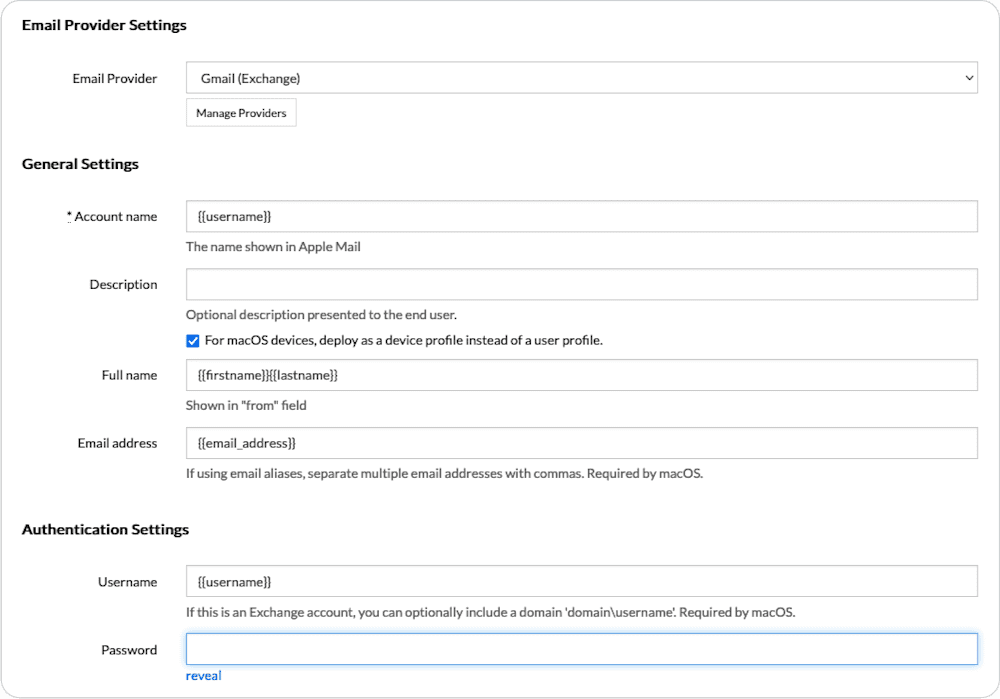
When you apply this profile to enrolled devices with authentication in place, the username, firstname, lastname, and email_address values are automatically populated when the profile pushes out to a device by MDM. A user only needs to enter their password to set up their email account on their new machine.
Example #3: Show user’s name On the LoginWindow screen
In one of our previous blog articles, we demonstrated how to use a custom configuration profile and custom attributes to set custom values on the Login Window on macOS.
Use that same process to create and assign the LoginWindow custom profile to your devices, but instead of manually setting the attribute values for each device, they are automatically populated using the data captured during the authentication process.
In summary, and where to go from here
There are numerous ways custom attributes can be used within your deployment, and capturing them via authentication is one of the most convenient ways to populate those attribute values. A few other common uses include:
Populating user account information for VPN profiles
Setting device names within SimpleMDM
Adding helpful information to device records in MDM for your IT team to use, like office location, warranty or service information, role or job title, etc.
If you are using any apps that support Managed App Configurations, populating custom attribute values for those managed configurations.
For those comfortable working with APIs, the possibilities are even greater. We won’t cover API usage in this article, but if that is something you are interested in, SimpleMDM does offer extensive API capabilities as described in our API documentation.
Common questions
What types of authentication are supported? What services can be integrated with SimpleMDM for authentication?
SimpleMDM supports both SAML and LDAP authentication. Any services that also support these should be compatible for integration with SimpleMDM.
What device types are supported for enrollment authentication?
iOS (and iPadOS) and macOS are supported for enrollment authentications.
